If the Evergreen Content Poster does not share posts to social media for your website, then the issue might be with WordPress’ Cron. This can be due to your website not having enough visitors or something is wrong with WordPress Cron such as it being turned off without a replacement.
There are two ways to go about addressing this issue, the first one( Method 1) is the simplest, the second(Method 2) involves creating a “True Cron” via your Cpanel account from your Web host.
If you are having trouble implementing Method 2 then please forward this document to your Web host support personnel. They will be able to implement the true cron for you. A recommended interval for the cron job would be once every 10 minutes.
Method 1.
You can create a Cron job for the Evergreen Content Poster using Cronjob.org:
Step 1.
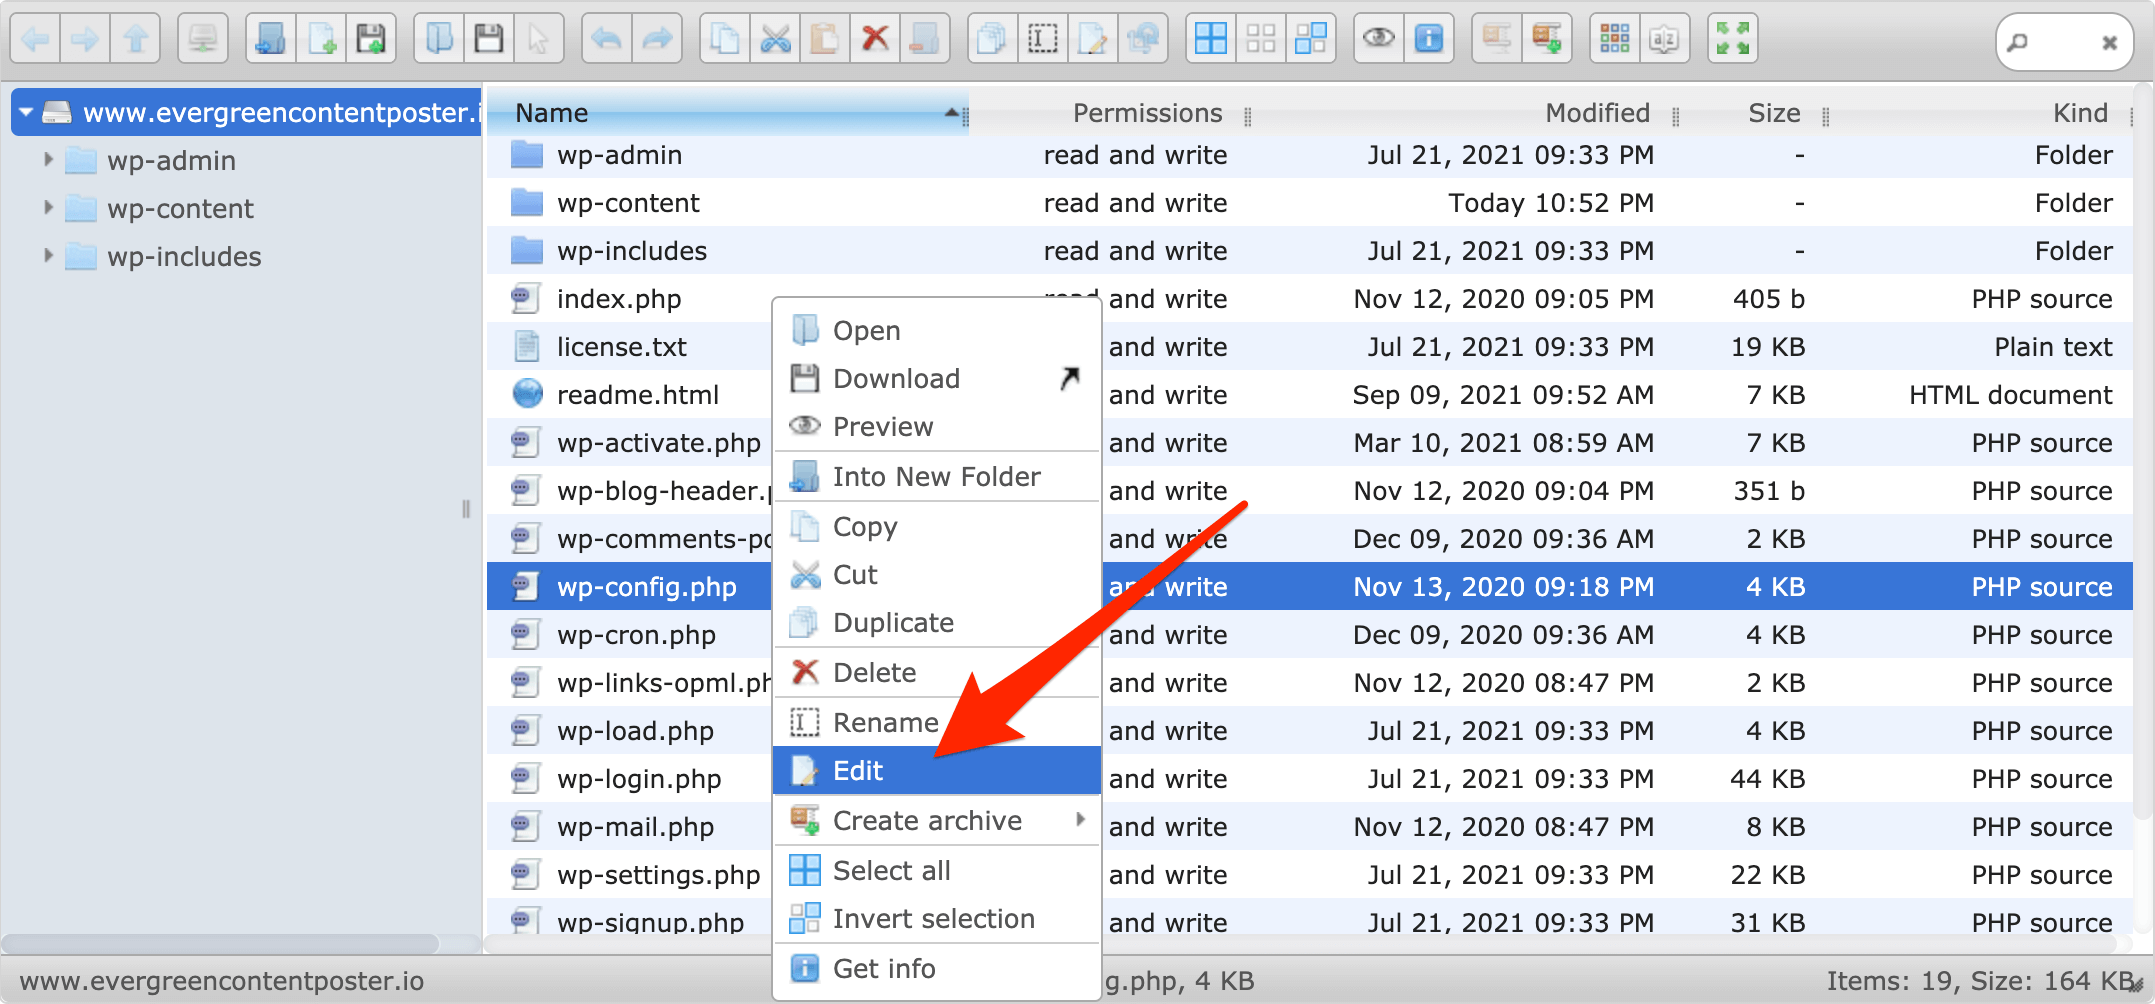
Turn off the default WP Cron by editing the wp-config.php file (located in the root of the folder where WordPress is installed). Open the wp-config.php file, add a new line after define(‘WP_DEBUG’, false); then add the following code on the new line:
define('DISABLE_WP_CRON', true);
Save your changes after you’ve added the new line.
If you are not sure how to navigate to this file via your Cpanel or FTP, you can install the following plugin which will allow you to edit the files on your server directly from within WordPress: https://wordpress.org/plugins/file-manager-advanced/
Once the plugin is installed you should have a new option called File Manager inside your dashboard. Click the menu item in your left menu bar to bring up the files.

Right-click on wp-config.php and select Editor to start editing the file. Add the following line:
define('DISABLE_WP_CRON', true);
Inside the file after define(‘WP_DEBUG’, false); So it looks like below:

(Be sure to save your changes when you’re done editing the file and then delete the File Manager plugin if no longer needed).
Once you have successfully turned off your default WP-Cron, the Evergreen Content Poster will show a warning notice that your WordPress Cron has been disabled:

Step 2.
Create an account on https://console.cron-job.org/signup, then log into your account on the website.
Step 3.

Click on “Cronjobs” from the left menu after logging into your account (1) and click the “Create Cron Job” (2) button to create a new cron job.
Step 4.
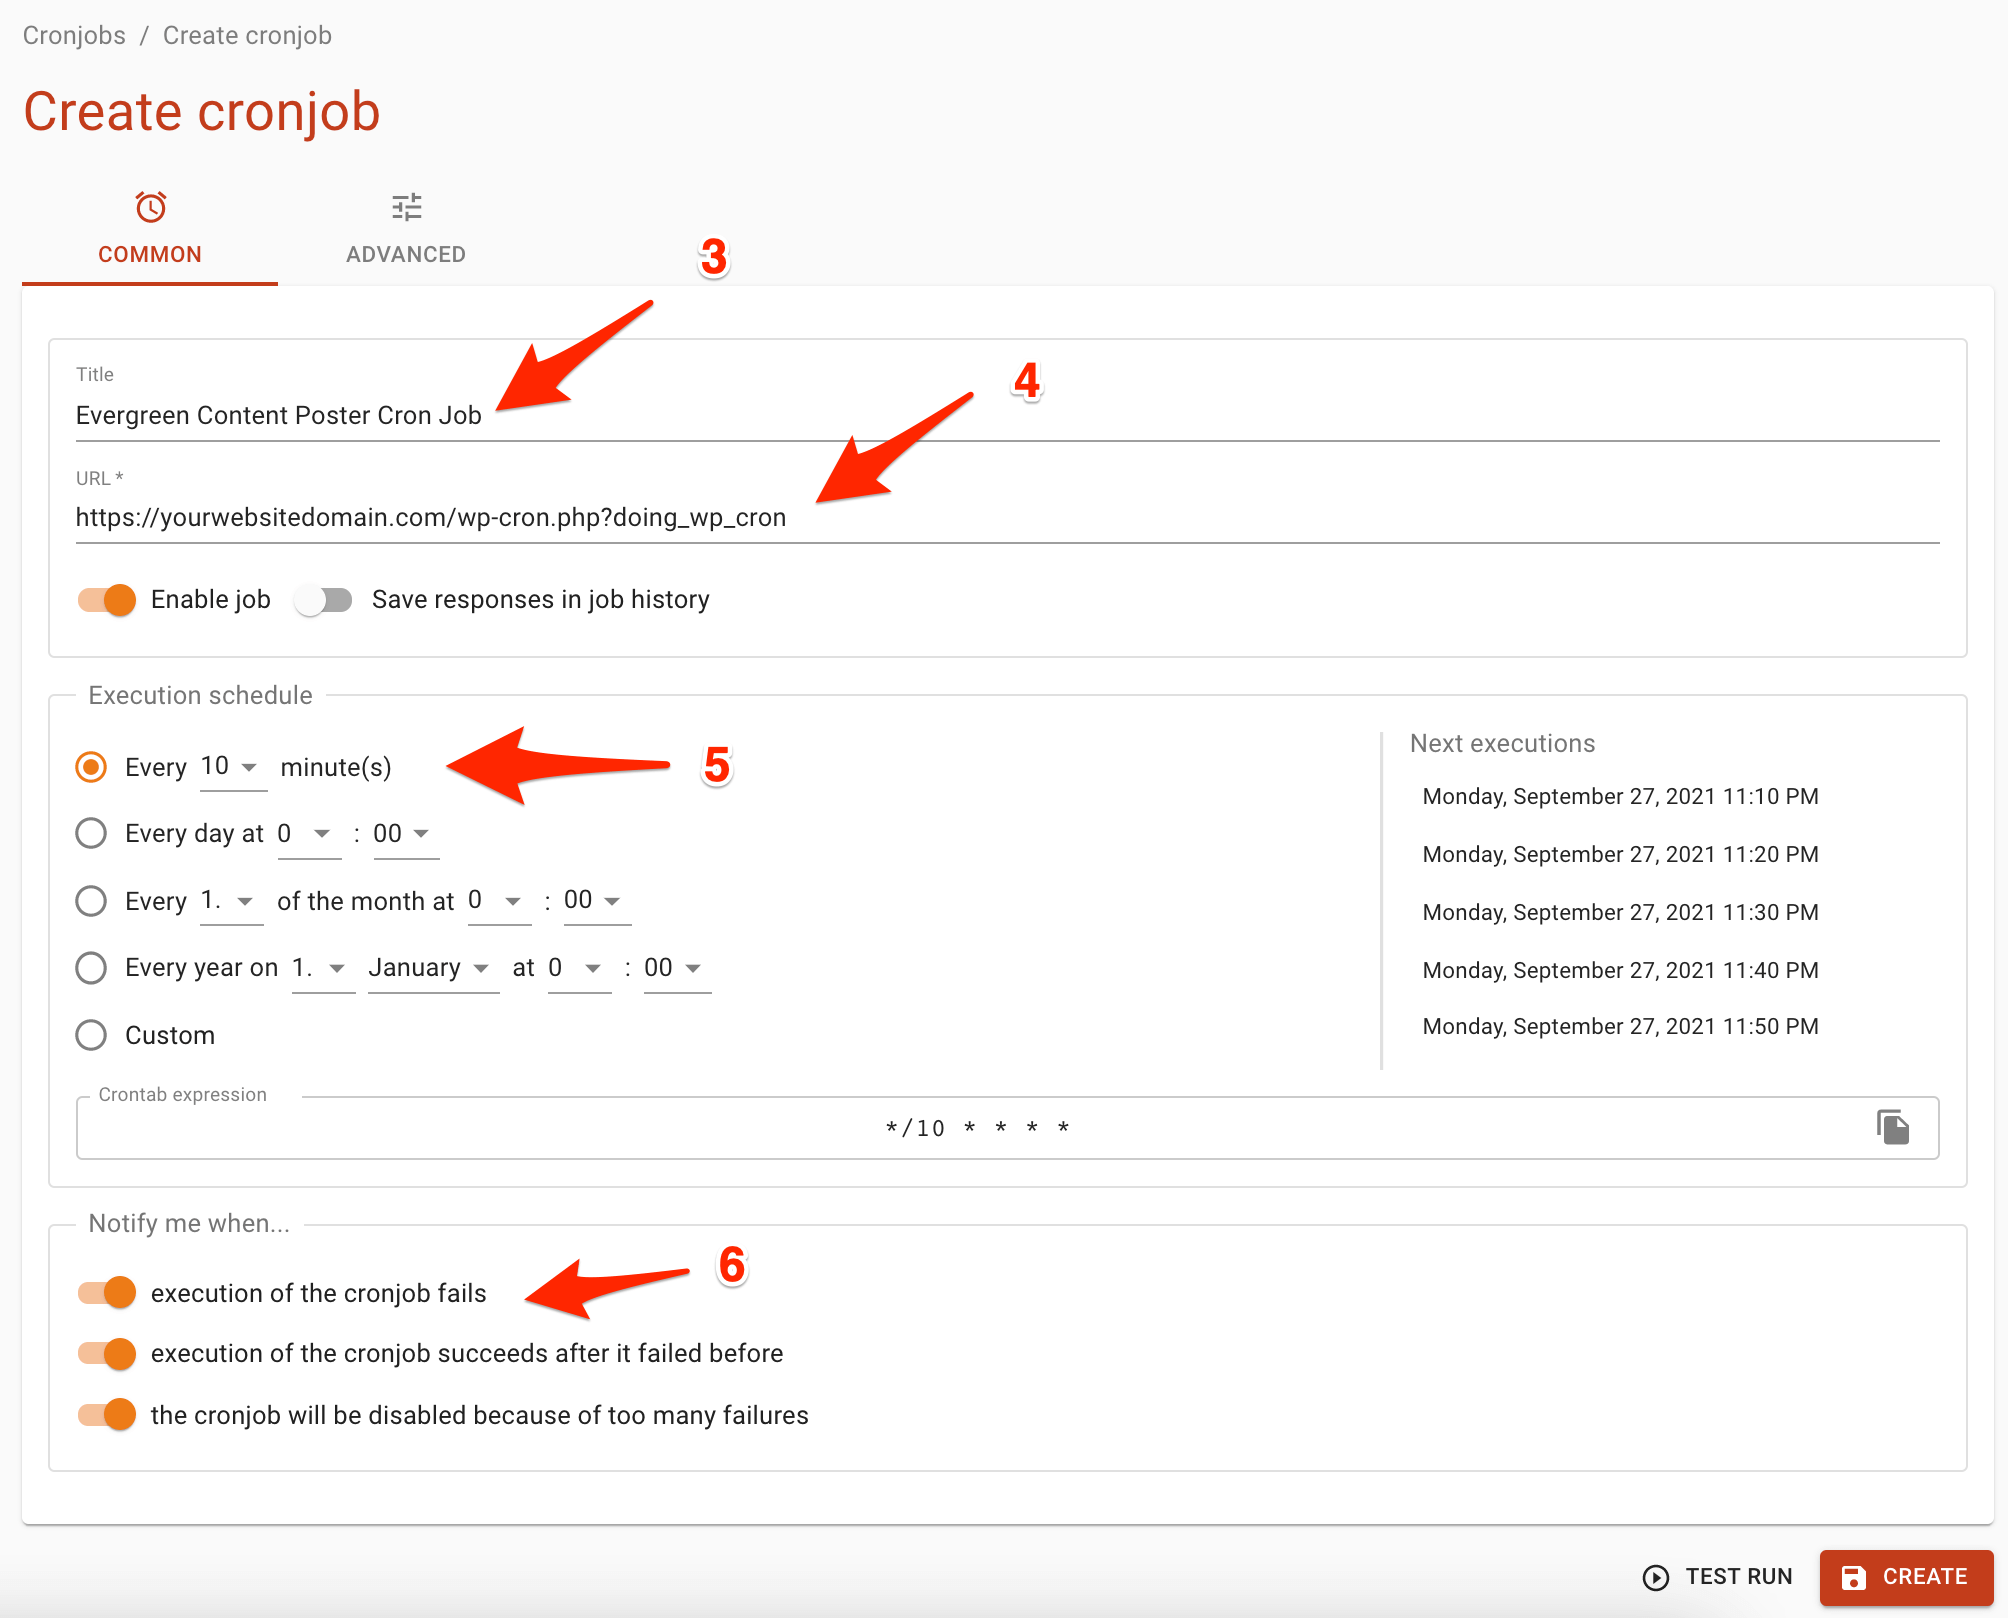
Fill out the details of the Cron job. For Title (3) enter anything you wish, for Address (4) enter your website domain suffixed with
/wp-cron.php?doing_wp_cron
Example: https://yourwebsitedomain.com/wp-cron.php?doing_wp_cron
- Change yourwebsitedomain.com to your actual website domain.
- If your website does not have SSL, then change HTTPS to HTTP
Then set the Cron execution schedule, we recommend every 10 minutes (5) and make sure to check the checkbox to notify you when “execution of the cronjob fails” (6). Be sure to run a test run to see if all is working and afterwards hit “create” to create and save your cronjob.
Step 5.
That’s it! Your cron job should now be created and if you did Step 4 correctly then you should see success messages in the Last Events section of your dashboard at https://console.cron-job.org/dashboard letting you know that the cron job ran successfully.
To dismiss the Evergreen Content Poster notice regarding your WP-Cron Job being disabled, simply click dismiss

Method 2.
The other method to fix the issue is creating a true cron for your website. This requires you to have access to your cPanel account to make the following changes. Or you can also do this by connecting to your server via SSH and editing the files yourself. Since most of the world offers cPanel, let’s try to make it as simple as possible and show you how you can do this using cPanel.
Step 1:
Just like with the previous method, we start by turning off the default WP-Cron. We do this by editing the wp-config.php file (located in the root of the folder where WordPress is installed). Open the wp-config.php file, add a new line after define(‘WP_DEBUG’, false); then add the following code on the new line:
define('DISABLE_WP_CRON', true);
Save your changes after you’ve added the new line.
Step 2:
Setting up a Linux Cron.
Warning: You must familiarize yourself with how cron jobs work. You need to have a working knowledge of Linux commands before you can use cron jobs effectively.
To set up a Linux Cron job in cPanel:
- Log in to your cPanel.
- In the Advanced section, click Cron jobs.
- Under Add New Cron Job, select the time interval. We recommend that you set the interval at 10 minutes.
- Set the cron command to the following, replacing yourwebsite.com with your actual domain name:
wget -q -O - http://yourwebsite.com/wp-cron.php?doing_wp_cron >/dev/null 2>&1
The above command tells the Linux server to run wp-cron via wget, which will trigger the wp-cron.php script to do its job on your schedule instead of on each page view.
- Click Add New Cron Job to set the cron
To test out the new cron, wait for the elapsed time period for the cron to run. If the cron does not run, please review the steps listed above to ensure that you have completed all steps correctly.
If you are not comfortable with performing any of these methods then we highly recommend you contact your web host for assistance. They will be able to perform either method for you in no time.
To dismiss the Evergreen Content Poster notice regarding your WP-Cron Job being disabled, simply click dismiss

Still having issues? Contact us here: Submit a Ticket


Leave a Reply